21.3. Adding a Slave Zone
To add a slave zone (also known as a secondary master), click the New button and select Slave Zone. Enter the domain name for the slave zone in the Domain name text area.
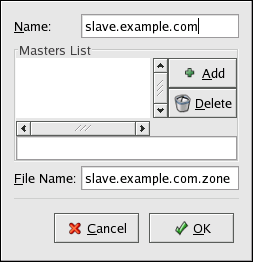
A new window will appear, as shown in Figure 21-4, with the following options:
Name — The domain name that was entered in the previous window.
Masters List — The nameservers from which the slave zone retrieves its data. Each value must be a valid IP address. You can only enter numbers and periods (.) in the text area.
File Name — File name of the DNS database file in /var/named.
After configuring the slave zone, click OK to return to the main window as shown in Figure 21-1. Click Save to write the /etc/named.conf configuration file and have the daemon reload the configuration files.
The configuration creates an entry similar to the following in /etc/named.conf:
zone "slave.example.com" {
        type slave;
        file "slave.example.com.zone";
        masters {
                 1.2.3.4;
                };
}; |
The configuration file /var/named/slave.example.com.zone is created by the named service when it downloads the zone data from the master server(s).